Loading...
 

Computers & Networks

A blog about computers, networks, and peripherals used in a small business or development lab environment to support the development of nano devices and systems.

X99 HPC unboxing 04: EVGA SuperNOVA P2 1000 W PSU

morreale Wednesday 24 of June, 2015
Many components topped my selection list as a result of one or more great reviews, but then got dropped from consideration as a result of reports of high failure rates, or if failures caused other components fail. I looked at the ratio of the number of 1 star rating to the total number ratings for a quantitative estimate of the products failures. The Corsair AV860i Power Supply Unit (PSU), for example, initially topped my list for a PSU, but had a lot of complaints of failures and users reported their motherboards and graphics cards were damaged when the supply failed. I became interested in this supply initially because of the monitoring software that could be used to monitor their power supplies, water cooler and memory products. I thought that this would be helpful when overclocking, monitoring, and maintaining the computer over time. Because of the high estimated reports of problems, I opted for the EGVA SuperNOVA P2 1000 power supply instead. It got great reviews and had some of the fewest complaints by users. Figure 1 shows the front of the box package. The packages is surprising heavy.

Image
Figure 1 EGVA SuperNOVA P2 1000 PSU Box Front

Figure 2 shows the back of the box that describes some of the features, the included cable, and a fan speed profile. The fan runs at 0 RPM until the operating temperature reaches 55ºC and then fan speed jumps to 750 RPM.

Image
Figure 2 EGVA SuperNOVA P2 1000 PSU Box Back

Figure 3 shows the contents of the box which includes an installation manual, a storage case for unused cables, cable ties, and 15 well-made power cables.

Image
Figure 3 EGVA SuperNOVA P2 1000 PSU Contents

Figure 4 shows the side of the PSU with the labeling and ratings.

Image
Figure 4 EGVA SuperNOVA P2 1000 PSU Side

Figure 5 shows the 140 mm fan.
Image
Figure 5 EGVA SuperNOVA P2 1000 PSU Fan

Figure 6 shows the connectors for SATA devices (4), peripherals (2), the CPU (2), and graphics cards (6).

Image
Figure 6 EGVA SuperNOVA P2 1000 PSU Connectors

The EGVA SuperNOVA P2 1000 PSU unboxing video is shown in Figure 7.

Figure 7 EGVA SuperNOVA P2 1000 PSU Unboxing Video

I cannot tell that the PSU fan is running over the very quiet CPU fan since it was install and has been silent during normal operation, but the systems does not put much of a load on the supply with just one graphics card. Normally the computer (Blackbird15) draws only about 80 W during routine use and especially when the VRM Digi+ motherboard power control is active. The CPU frequency and power are dynamical controlled for power efficiency. The CPU can dissipate power as low as 18 W as reported by the ASUS AI Suite software. Normally, the CPU runs at 33 to 35ºC depending on the average temperature 27ºC (∆T=6 to 8ºC). The power is measured and displayed by the UPS connected to Blackbird15. The LCD monitor and other peripherals are on another UPS.

To load the PSU, I run the Intel Linpack benchmark and Blackbird15 draws 275 W during a long calculation measured when the CPU reaches a peak temperature of 80ºC (∆T=53ºC). The power peaked at 284 W. To produce a larger more continuous power demand, I ran Witcher 3: The Wild Hunt along with ran Prime95 at the same time. I delighted to see Witcher 3 still ran smoothly even while Prime85 was also running. The Prime95 torture test calculates prime numbers on all 12 processors (6 cores, 12 hyperthreads). The power dissipation increased to 428 W, the CPU temperature ran at 75ºC, the GPU usage went to 99% and the GPU fans ran at 54%. The overall computer fan noise increased a little and I’ve mistaken the GPU fans running for a slight increase in CPU fan noise. During this test, I could not tell if the PSU fan was running.

The SuperNOVA PSU provides a 1000 W combined output from five outputs: +3.3V, +5V, +12V, +5Vsb, and -12V. The unit is a 80 PLUS Platinum rated power supply so it maintains a minimum 92% efficiency over the entire output/load range. Most power supplies have their maximum efficiency at the maximum load so power is wasted at light loads, but not with this power supply. The computer will run with good power efficiency even though it typically runs at less than 10% of the maximum load. Even running Witcher 3, Prime95, playing music, and the Firefox browser only produced a 43% load. The only way to really fully load the supply is to add a second graphics card, a Tesla Accelerator, or a Intel Phi card.

Determining the power requirements for this new computer was challenging. The information on the ASUS Rampage V Extreme (RVE) and the STRIX GTX 980 is vague. The RVE manual indicates that the supply voltages are +12V, +5V, and +5VSB and the power consumption is 5 A. The STRIX GTX 980 and ASUS website provide little or no data on power requirements. The NVIDIA website indicates that power dissipation of the NIVDIA GTX 980 at 165 W. ASUS overclocks their graphices so it’s not clear that the power consumption is the same. I used some of the power estimator websites like PC Part Picker, Outervision Extreme, forums, and review sites to help determine what size PSU to get. I prefer to know the minimum and maximum power requirements for each component to determine the appropriate size power supply so this is not a very reassuring way to size a PSU. I think it will be a good fit and might support four graphics cards as part of future upgrades. From my measurements above, I estimate the following average power consumption:
  • RVE Motherboard: ~60 W
  • CPU/Memory (routine use): ~20 W with dynamic frequency and power adjusts active
  • CPU/Memory (Linpack): 215-224 W overclocked at 4.0 GHz
  • GPU: 144-153 W
What I’ve able to gather from third party sources is that the RVE motherboard consumes up to 100 W, memory can consume 25 W, the CPU is rated at 140 W TDP (160 W TPD when overclocked at 4 GHz), the WE RE drive consumes ~10W, 3 W for the SSD, and the GTX 980 consumes up to 165 W. This gives a total estimated maximum power demand of 443 W without overclocking. PC Part Picker estimates my power dissipation at 463 with one graphics card and 958 W with four graphics cards. My 428 W load measurements seem to show a slightly lower and perhaps more of typical power consumption than estimated from these third party. It’s encouraging that the power dissipation is running lower than estimated.

The EVGA SuperNOVA 1000 W should be able to power at least two additional GTX 980 in the future. It’s not clear if I could add a third GTX 980 graphics cards (four in total) without doing some comprehensive power measurements. The RVE motherboard has a nice BIOS options, for example, to permit phone charging over USB 3.0 ports and all though this feature was active nothing was charging at the time of these tests so the power consumption for this feature is missing and unknown at this point. Using desirable features like this would likely push this 1000 W supply to the edge of performance when running four GTX 980 graphics cards and the CPU at full load along with peripherals. I’m looking forward to the learning how it will perform and to the application that requires all that processing power. In all, it’s been a stable and quiet supply with a great build quality.

Index


X99 HPC unboxing 03: ASUS STRIX GTX 980 Video Card

morreale Monday 22 of June, 2015
I got hooked on photograph in my high school journalism class, but I did not realize it then. My dad bought me a used Yashica TL Electro SLR camera for the class. I took black and white photos for the class. I did not photograph much until I got out of college and started working. I bought a Minolta Maxim 7000i to take photographs when I traveled. I prefer to photograph nature and landscapes and like high color saturation so I used Ektrachrome 100 film generally. My photographs have been inspired by photographer Galen Rowell who wrote the wonderful book Mountain Light. It was a wonderful camera and it survived me riding and slipping my mountain bike in to a canal. Mountain biking with a SLR has some challenges.

We were on vacation and I was photographing on the middle of a jetty near Dana Point, CA when two giant waves crashed over the jetty knocking everyone over. One person was taken to the hospital with maybe a sprained or broken wrist (not sure). It was a beautiful sunny day with calm seas up until that moment. It was pretty scary and totally unexpected. Seawater poured out of the camera and the display gave an error message. Everyone was lucky to survive with mostly minor injuries but the camera did not survive this encounter with the waves.

Quite a few years went by and I bought a Nikon D300 DSLR in 2008. The digital camera technology really seemed to be as good if not better than film at that point. It was expensive and I had mixed feelings about spending so much on such a new an unknown technology. It also weights a ton, but was the best camera out on the market at the time. It turned about to be a great investment and a fantastic camera. I really can do most anything, and can be used any situation all though I need to get the book out to learn how to use some of the setting occasionally. Shooting in RAW mode and using Photoshop and Lightroom gives you the chance to correct camera exposure errors and achieve as little or as much color saturation as I like. We returned from a two week vacation from Seattle with four 4 GB memory cards. My ASUS P4PE based computer pitched over. I could not find better AGP graphics card (NVIDIA Geforce Ti 200) or processor to upgrade it at the time.

I had to setup another computer up just for my digital photography (Dell Dimension 8400). I upgraded with a 1 TB hard drive, and a NVIDIA GeForce 9800 GTX+ in September 2008. The graphics card made a huge difference in performance. It made editing and producing photo galleries for sharing possible and practical. Table 1 shows the comparison of the GeForce 9800 GTX+, the standard GTX 980, and the ASUS STRIX GTX 980.

Image
Table 1 NVIDIA Graphics Card Specifications

The ASUS STRIX GTX 980 is overclocked by 5% over the standard GTX 980 from NVIDIA. ASUS also provides tools so that you can adjust the overclocking and maintain a target frame rate during gaming. The GPU processing power has roughly increased 7 times in 7 years. The performance is comparable to Intel Paragon XP/S 140 built in 1993. It had max speed of 143 GFLOPS and cost Sandia National Labs $9 M to build at the time.

Floating point performance is generally measured with the LINPACK benchmark which calculates the solution to a large system of linear equations. The benchmark uses 64 bit floating point (FP64) calculations. For the GTX 980, the 64 bit floating point is considered double precision floating point. The double precision floating point rate is 32 times slower than that of the single precision floating point rate due to reduced double precision hardware and this is designed to improve power efficiency. Single precision performance was optimized for gaming. For scientific computing where double precision floating point performance in important the 700 series GTX Titan Black, Tesla K40 and K80 GPU accelerators, or an Intel Phi are better choices.

The ASUS STRIX GTX 980 is nicely packaged. Figure 1 shows the front of the retail box.

Image
Figure 1 ASUS GTX 980 Video Card Box Front

Figure 2 shows the back of the box.

Image
Figure 2 ASUS GTX 980 Video Card Box Back

Figure 3 shows the contents of the box which includes an installation manual, installation disk, decals, and power cable.

Image
Figure 3 ASUS GTX 980 Video Card Box Contents

Figure 4 shows the front of the graphics card. The card is really nicely built and the thermal management looks really good.

Image
Figure 4 ASUS GTX 980 Video Card Front

Figure 5 shows the video connects. I use the DVI connector with my KVM switch.

Image
Figure 5 ASUS GTX 980 Video Card Connectors

Figure 6 shows the back of the video card. The back of the video card is a metal plate that is probably part of the thermal management of the card. It’s very flat and allows for use with large CPU coolers. I was concerned that this card and 140 mm by 140 mm CPU cooler would interfere. The graphics card, the CPU cooler, and motherboard companies don’t provide enough information on the mechanical dimension to know for sure that these components will all fit without interference. The low profile back was a key feature of the card. Without it I would have needed to use a smaller CPU cooler which would limit my CPU overclocking performance.

Image
Figure 6 ASUS GTX 980 Video Card Back

The GTX 980 unboxing video is shown in Figure 7.


Figure 7 GTX 980 Video Card Unboxing Video

The photos for this series of blogs were taken with my D300 and processed with Lightroom 3.6 on this system (Blackbird15). The videos were also produced using a Canon S95 and Adobe Premier CS 5. Both programs run very fast with minimal lag. Exporting a 6 minute video in YouTube widescreen HD format takes about 130 seconds with the processor overclocked at 4.0 GHz. It takes about 1.5 hours on my laptop (2.3 GHz Core 2 Duo). This is the only performance indicator that I’ve run. It’s not clear how much of this performance is associated with the CPU or GPU. I’d like to run a LINPACK benchmark on the GPU but have not found one yet. I have not stressed the GTX 980 at all and have not found any complaints with it after several months of working with it. It's also been totally silent throughout this time. The game Witcher 3 came free with the video card. I have not played enough of the game to see the fans active or an increase in GPU temperature.

Photographing the components used to construct Blackbird15 is akin to taking still life photographs and has been more challenging than I expected. I bought a couple of the Cree 100W equivalent (1620 lumens) Daylight (5000k) LED light bulbs to light up my subjects. I also have fluorescent light fixtures with two 40 W 5000k tubes in them. This generally provides enough light to photograph objects with high depth of field and at a low ISO number most of the time. The 5000k color temperature bulbs were selected to try to give a light spectrum that covers the full Adobe RGB color spectrum for a better color balance in my still life photographs. Electronic components and associated packaging can be reflective so my lighting arrangement produces highlights at certain angles or the exposure isn’t so good. Better light diffusers would help here. Photographing the Corsair 750D case was especially difficult as there is no contrast. Even with the bright light lights, getting good detail was hard. It makes me wonder how Kubrick filmed the monolith in 2001: A space Odyssey.

My photograph catalog has reached more than 47000 images in 455 libraries since getting the D300. It’s a fabulous hobby and I’m looking forward to learning what new things can be achieved with this new hardware. The following photos are just two examples from my collection. Figure 7 shows an image I took from the top of Observation Point trail in Zion National Park in the late 90s with my 7000i using Ektrachrome 100 film that was scanned by Kodak on to a Photo CD, and processed with Adobe Photoshop to a PSD format.

Image
Figure 7 Observation Point Trail Zion National Park circa 1998

Figure 8 is a photograph I took at a local arboretum and demonstrates my fondness for high color saturation. It was taken with my D300 and processed with Adobe Lightroom 3.6.

Image
Figure 8 Flowers in Color High Saturation

References
For a good overview and review of the GTX 980 video card see posting at Anandtech.

Index

x99 HPC unboxing 02: ASUS Rampage V Extreme

System Administrator Saturday 13 of June, 2015
I’m trapped in the future. It’s my fault for reading technology roadmaps, process technology roadmaps, and product previews. Everything in the future has better performance than what I can buy today. Finally, there are motherboards and a chipset are actually available that provides PCIe 3.0, USB 3.0, DDR4 memory, and supports processors with more than four cores. The future might be here now at least for the moment.

Motherboards are a work of art. It’s impressive how they connect everything together and transport data at high speed between various resources connected to them. There is a rich ecosystem of boards and components that is challenging but also fun to select between all the different available options. To get a CPU with more than four cores, I went for the Intel X99 chipset. Figure 1 shows a block diagram of the system architecture of a core i7 processor with the X99 chipset.

Image
Figure 1 Intel High End Desktop Platform x99 Chipset

The X99 chip provides:
  • 6 USB 3.0 ports
  • 8 USB 2.0 ports
  • 1 Gigabit Ethernet LAN port
  • 1 HD Audio
  • 8 PCIe 2.0 lanes
  • 10 SATA 3.0 ports
  • 8 DDR4 memory slots
  • 28 or 40 PCIe 3.0 lanes depending on the processor
I looked at many motherboards and selected the ASUS Rampage V Extreme (RVE) due to overwhelming number of great reviews and past experience with ASUS motherboards. In the past, ASUS has supported their motherboards with BIOS updates for quite of long time. It won out for flexibility and performance, and got many favorable user comments. ASUS enhances the X99 chipset by adding:
  • 10 USB 3.0 ports on the back panel
  • 2 USB 2.0 internal
  • 1 enhanced surge protection for the Ethernet port
  • 8 channel audio with S/PDIF output port
  • DDR4 memory overclocking and Extreme Memory Profile (XMP) support.
  • PCIe configurations support 4-way, 3-way, and 2-way SLI graphic card configurations, and M.2 SSD option that shares PCIe lanes.
  • 1 Wi-Fi 802.11 a/b/g/n/ac and Bluetooth v4.0 radios.
My list just highlights some of the enhancements on this feature rich E-ATX motherboard. Figure 2 show the front of the box.
Image
Figure 2 Box Front

Figure 3 shows the back of the box listing key features of the board.
Image
Figure 3 Box Back

Figure 4 shows the inside front cover showing even more features.
Image
Figure 4 Box Inside Front Cover

Figure 5 shows all the SATA cables, SLI cable, CrossFireX cable, IO panel, user guide, and other accessories that came with the motherboard.
Image
Figure 5 Box Contents

Figure 6 shows the motherboard in the inner box along with the OC panel. The board fits tightly in the box and had to be carefully removed. The OC Panel is easily removed.
Image
Figure 6 Box Motherboard with OC Panel

Figure 7 shows the RVE motherboard and OC panel after it was remove from the box. It’s amazing, and much heavier than I expected.
Image
Figure 7 ASUS ROG RVE Motherboard and OC Panel

Figure 8 shows a close up of the top of the RVE motherboard.
Image
Figure 8 ASUS ROG RVE Motherboard Top

Figure 9 gives a view of the RVE IO panel.
Image
Figure 9 ASUS ROG RVE Motherboard IO Panel

Figure 10 shows the back or bottom side of the mother board.
Image
Figure 10 ASUS ROG RVE Motherboard Bottom

The RVE unboxing video is shown in Figure 11.

Figure 11 Case Unboxing Video

The RVE is really good. The BIOS is easy to use and makes overclocking very easy. The RVE as good as it is, overlaps a lot of hardware features so that only one device can be used at a time or that bandwidth must be shared between two devices. The M.2x4 SSD card slot shares bandwidth with the PCIE_X8_4 slot and this slot may only operate in x4 mode when the M.2 SSD card is being used, for example. This also means that if you use a M.2x4 SSD card, the only two or three graphics cards can be used (3-way SLI).

The OC panel is really useful for monitoring and controlling the motherboard. I installed in the top 5.25 bay and use it to monitor CPU temperature, CPU fan speed, and overclocking rate all the time now. When it is in the bay, however, you lose access to buttons that are not available on the front so you can’t see all available monitoring points or control all the settings. It would be useful if there were a few extra buttons so that you monitor and control everything when installed in the case any time.

The RVE motherboard has a test port for measuring voltages on the board called the probelt. The pads are small and once the board in case it’s hard to get to them. There is a real concern about shorting out the probe points with the probes of a multimeter especially in the case. It would be better if the test points were socketed and ASUS provided a test cable that easily accommodated multimeter probes. My meter does logging so I could look at the long stability or look for surges on the 5 and 12 V supplies over hours to days. This would be a more useful implementation of the probelt.

References
Index


x99 HPC unboxing 01: Corsair Obsidian 750D

morreale Thursday 11 of June, 2015
I like full tower cases. They provide lots of room for hard drives, optical drives, peripherals, cabling, fans, water coolers, large power supplies, and good cooling generally. I like rectangular cases without a lot of contouring, doors that hide optical drives, and hinged side panels.

I was looking for a full tower case that was less than 8.25 inches (210 mm) wide to fit under the corner of my L-shaped computer desk. This is dead space and the location of my old computer. New full tower cases have space for routing cable behind the mother board and this makes them wider. After a lot of searching and not finding a desirable case, I gave up on this requirement. I even looked at half height towers and mini towers but it did not seem like a good trade-off to get a narrow case and give up so much useful volume.

There are some really nicely styled cases too but the styling seemed to increase the height or width of the case so I opted for the straight sided cases. A number of cases considered had USB and hard drives ports on the top of the case. I did not consider these cases because I expected access to be blocked when the computer was under the desk so I did not revisit or consider these kinds of cases. These features also made installation of optical drives and water cooler fans at the top of the case more complex or limited the size of the water cooler fans that might be used in the future.

Doors on the front of the case that hide the optical drives look really nice, but get in the way over time. You have to open and close them all the time. I ended up removing them after a while.

Hinged side panels require a lot of space to open and are not easy to use when your computer is located in a confined space under or near a desk. I do however like latches to release and close the side panels. Latches make opening and closing a side panel very convenient.

With all these requirements, I selected the Corsair Obsidian 750D Full Tower ATX case. It’s a great case. It measures 560mm x 235mm x 546mm. It doesn’t have any extreme contours but is still very stylish. It has three 5.25in bays, four 2.5in bays located in back of the motherboard, and eight bays for 3.5 inch or 2.5 inch drives located in the bottom front of the case. The bays are really two sets of four bays and can be located next to each other or stacked on top of each other in front of the front fans. I placed both bay sets on top of each other in front of the font fans. This configuration gives better cooling for the drives and makes it a little easier to route power cables from the power supply. Moving the drive bays required a Philips screw driver and was the only time I needed as screw driver after installing the motherboard for this mostly tool free case. The two front fans and one rear fan are all 140 mm fans and are very quiet.

There is room for mounting two 140 mm fans or three 120 mm fans at the top of the case, and two 120 mm fans at the bottom of the case. These fans are not included with the case.

A reviewer of the case on one site complained about the use of dimples for standoffs to mount the motherboard. I was concerned about this too, but found that the dimples have been replaced with actual standoffs. This is a very welcome improvement.

The case has three dust filters with one on the top, one in the front behind the frond fan cover and one on the bottom below the powers supply. The filter keeps dust from building up inside the computer and seems to work very well. I had no idea my room was so dusty.

Figure 1 shows the front of the box that the case was shipped in. It arrived in very good shape for being one of the heavier items that I’ve ordered.

Image
Figure 1 Box Front

Figure 2 shows the back of the shipping box.
Image
Figure 2 Box Back

The case was nicely packed and Figure 3 shows the case once it was removed from the box and the packing material was removed.
Image
Figure 3 Case Front & Left Side

Figure 4 shows the left side of the case and the large acrylic window can be seen.
Image
Figure 4 Case Left Side

Figure 5 shows the back of the case.
Image
Figure 5 Case Back

Figure 6 shows the right side of the case
Image
Figure 6 Case Right Side

Figure 7 shows the front of the case with all the front cover panels in place.
Image
Figure 7 Case Front

Figure 8 shows the front of the case with the panel covers removed the two front fans can be seen along with the front dust filter.
Image
Figure 8 Case Front with Cover and Filter Removed

Figure 9 shows the left side of the case with the side panels removed. This shows the main case cavity where the motherboard, power supply, and eight 3.5/2/5 inch bays are located.
Image
Figure 9 Case Left Side with Covers Removed

Figure 10 shows the back of the case with the side covers removed. The cut out for the IO panel, rear fan, and the nine expansion slots can be seen.
Image
Figure 10 Case Back with Covers Removed

Figure 11 shows the right side of the case. The front panel IO connectors and switch cables can be seen along with the cable routing ports for running cables behind the motherboard. There is a large cut out in the motherboard mounting panel for access to the CPU back plate.
Image
Figure 11 Case Right Side with Convers Removed

Figure 12 show the top of the case with the filter removed.
Image
Figure 12 Case with Top Filter Removed

Figure 13 shows the bottom of the case with the filter removed
Image
Figure 13 Case Bottom with Filter Removed

Figure 14 shows the front fans from inside the case.
Image
Figure 14 Case Front Fans

The unboxing video is shown in Figure 15.

Figure 15 Case Unboxing Video


Like I said before, this is a great case. There are several things keeping this from being an excellent case, however. First, the panel that the motherboard mounts to is pretty flexible and the motherboard flexes when attached to it. Some stiffeners would help in this case. Next, the right and left side panels use two screws each to lock the panels in place. The side panels won’t stay in place without at least one screw. To add a new drive, for example, you need to remove both panels to route cables behind the motherboard and install the drive in a bay in the main side of the case. Latches on the side panel would really be a welcome improvement here and make upgrades and addition so much easier.

The top of case is a grill with a filter with magnetic strips to keep it in place. It’s nicely made, fits well, and provides a lot of ventilation. You can feel a slight bit of airflow out of the top, and with the CPU cooler fan running at about 600 RPM and three case fans running at around 450 to 520 RPM, the case is surprisingly silent. My concern is, however, that small bits of metal, or liquid from condensation from a cold drink or spilled drink could fall through the filter and ventilation holes and short something out. A small tray, shelf, organizer that sits about 50 mm off the top as not to block airflow would provide spill protection and provide a place to hold phone docks, chargers, papers, and extra cables and act like storage rack would be very useful. It might make a nice accessory for Corsair.

Lastly, I like the clear left side panel more than I expected. I don’t get to use it much because the computer sits next the shot leg of my L-shaped desk and this blocks the view. It’s been hard to determine the composition of large side window. I think it may be acrylic. If so it would allow for a lot more EMI from the case. A transparent conductive film placed on the inside of the window would be of value. I ordered a solid side panel to replace it to ensure EMI integrity.

Index

x99 HPC Build 00: Introduction

morreale Monday 08 of June, 2015
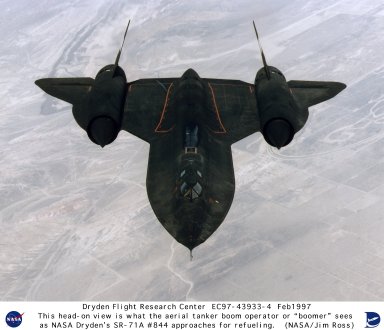
It was time to build a new computer. My present computer celebrated first power up 11 years ago and is known as Blackbird after the SR-71. It’s been upgraded many times over the years with new peripherals, monitors, memory, and hard drives. It’s based on the ASUS P4PE motherboard. I’ve build other computers based on Gigabyte and Supermicro motherboards.

My first computer was an IMSIA 8080 with a Z80 CPU board, 24 K bytes of static RAM, and a Northstar 5.25 floppy disk drive. It ran Northstar DOS and BASIC. I built it from a kit when I was in high school. I had help from the technician at the shop where I purchased it to install a white wire mod to make the front panel work with the Z80 CPU board otherwise it would have never worked. I’m very grateful for his help.

Anyway, I wanted a new High Performance Computer (HPC) that I could upgrade over the years and would have enough CPU power for applications like photographic processing (Photoshop, Lightroom) , video production (Premiere), electronic CAD (schematic capture, PCB layout, IC layout, & SPICE circuit simulation), 3D CAD modeling (Sketchup), and mathematical modeling (Mathematica), This meant the new computer should have a CPU with multiple cores, large amount of RAM, and powerful graphics card that supports parallel and floating point processing. I’m also curious about some of the new games as well even though I don’t game much.

I’ve been reading about computers and technology for years to keep up on what is happening with PCs and the technology used build them. It’s amazing that we can build a desktop computer that would have been considered a super computer not so long ago. Current day processor containing more than 5 billion transistors is just amazing. I read reviews and identified specific components intently for a couple of months. These sites have been very useful and helpful at identifying relevant components, and include:
Anandtech, TomsHardware, and Tweaktown are three of my favorite sites. After selecting candidate components, I would read reviews and forum sites to see what users liked and did not like about the hardware, or find out what problems or issue where associated with a particular component. I used Amazon and some of the forum sites at the sites list above for to get this information. The intent was to use this information to select system components with a long operating life and with excellent reliability. The final Bill of Materials (BOM) follows:

Image Case: Corsair Obsidian 750D Full Tower (CC-9011035-WW)
Image Motherboard: ASUS Rampage V Extreme
Image Video card: ASUS STRIX GTX 980 (STRIX-GTX980-DC2OC-4GD5)
Image Power Supply: EVGA SuperNOVA P2 1000 W (220-P2-1000-XR)
Image RAM: Corsair Vengeance LPX 32GB (4 x 8GB) DDR4 DRAM 2400MHz C14 memory kit (CMK32GX4M4A2400C14R)
Image Storage: Samsung 850 Pro 512GB 2.5-Inch SATA III Internal SSD (MZ-7KE512BW)
Image CPU: Intel core i7-5930K (BX80648I75930K)
Image Optical Drive: Pioneer BDR-2209 Blu-ray/DVD/CD writer
Image Storage: WD RE 2 TB Enterprise Hard Drive: 3.5 Inch, 7200 RPM, SATA III, 64 MB Cache (WD2000FYYZ)
Image CPU Cooler: Phanteks PH-TC14PE
Image Operating System: Windows 8.1 Pro 64 bit


Figure1 shows a preview of the system build.

Image
Figure 1 BlackBird15 X99 HPC System


Future blogs will provide a short description of the component, my impressions of the components, unboxing photographs and unboxing videos, and then the assembly of this new HPC which I call Blackbird15.

Image
Image source NASA Dryden Flight Research Center Collection

Index

Password security

morreale Tuesday 20 of January, 2015
Engadget reports the top 25 passwords used on the Internet today. All are easily broken and 67% of the passwords that use dictionary words with simple number substitutions can be broken using modern password cracking software. Openbuffer has posted an article describing four method for creating secure passwords that are relatively easy to remember.

Raspberry Pi GPU

morreale Tuesday 01 of July, 2014
I was delighted to learn that the processor on the Raspberry Pi has a built-in GPU that can provide 24 GFLOPS of computing power, which is just amazing. I hope to see CUDA video drivers some day, which will give Mathematica a big performance boost. For more on the GPU, also see Herman Hermitage's GitHub page.

Image

Embedded supercomputer

morreale Saturday 29 of March, 2014
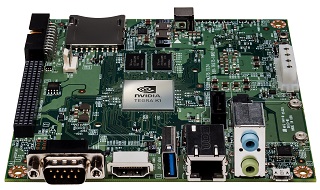
NVIDIA has announced the Tegra K1 CUDA embedded super computer, and the Jetson TK1 development kit (shipping in April). The development board contains
  • Tegra K1 SOC
    • Kepler GPU with 192 CUDA cores
    • 4-Plus-1 quad-core ARM Cortex A15 CPU
  • 2 GB x16 memory with 64 bit width
  • 16 GB 4.51 eMMC memory
  • 1 Half mini-PCIE slot
  • 1 Full size SD/MMC connector
  • 1 Full-size HDMI port
  • 1 USB 2.0 port, micro AB
  • 1 USB 3.0 port, A
  • 1 RS232 serial port
  • 1 ALC5639 Realtek Audio codec with Mic in and Line out
  • 1 RTL8111GS Realtek GigE LAN
  • 1 SATA data port
  • SPI 4MByte boot flash
The board is rated at 326 GFLOPS and costs $192. NIVIA is sponsoring a computer vision challenge and offering a the Jetson TK1 DevKit to the first 50 qualifying entrants.


Image

Hard disk failure rates

morreale Thursday 23 of January, 2014
Tweaktown has posted a report from BlackBlaze on Hard disk failure rates. BlackBlaze is an online backup hosting service. Seagate had the highest annual failure rate of 14% for the 1.5TB model, and 10% for the 3TB and 4TB models. Western Digital had an annual failure rates of 2-3% for their 1TB and 3TB drives. Hitachi had an annual failure date of less than 2% for their 2TB, 3TB, and 4TB drives. The report shows that both the Seagate's Barracuda LP 2TB and Western Digital's Green 3TB
drive produced errors from the start.

Image Image

Windows 8 guide

morreale Monday 01 of April, 2013
Toms Hardware has posted The Definitive Windows 8 Review And User Guide. It's a handy guide on how to work with Windows 8 as it is reported to have a very different interface than prior versions of Windows. The article describes the different versions of Windows 8, upgrading, hardware requirements, installing, setting up and using the new OS. The follow up article Windows 8: Clarifying Codecs, Compiling, And Compatibility provide more information on compatibility of hardware and drivers that was not known at the time of the original article or has been clarified by sources independent of Microsoft.

It's very strange that Microsoft keeps trying to copy what everyone else is doing. It would be better if they just focused on building the best operating system in the world. Anyway, I look forward to working with Windows 8 some day. A tablet/laptop with Windows 8 and a Haswell processor would be very interesting and would likely run most of my existing applications now running on Windows XP.

Intel Phi

morreale Thursday 21 of June, 2012
Intel has its new supercomputer coprocessor called the Xeon Phi. It provided 50 parallel processors and provides 1 TFLOP on one PCIe card.

Image

CPU fanless heatsink

morreale Monday 23 of April, 2012
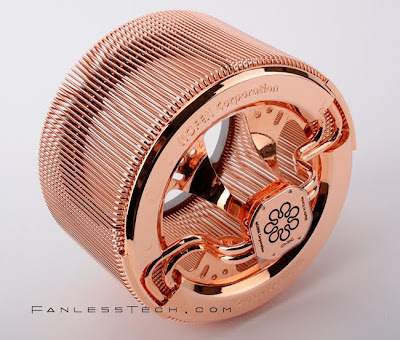
The new Z77 motherboards are out and the Intel Ivy Bridge processor is being released. I ran across the NOFAN CR-95C COPPER fanless heatsink from FanlessTech for processors rated at 100 W TDP. It looks to have a bunch of heatpipes connecting the processor to the heat fins. The heatsink looks like a work of art. If I find a review I'll posted it. This combined with a fanless power supply should make for a very quite systems.

Image

funf

morreale Monday 02 of April, 2012
The MIT Media lab has started funf an
open sensing Framework for sensing and data processing for mobile devices. The site provides functionalities that enable the collection, uploading, and configuration of a wide range of data from mobile devices. A beta for android devices (it's open source after all) is available, but has some security issue so review it carefully.

Image

PC's rule

morreale Friday 20 of January, 2012
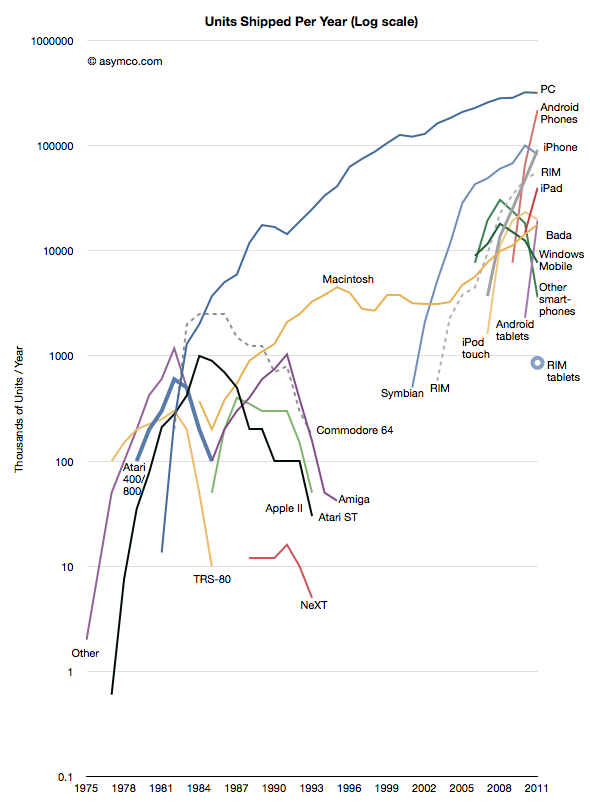
I ran across this interesting plot of global units shipped per year on a log scale. It's impressive how quickly mobile phones shipments have grown. When will Android phones out ship PCs?

Image

Holiday with an iPad

morreale Saturday 07 of January, 2012
Last xmas (2010), I ended up setting up and using a Kindle 3 with WiFi and 3G. I bought it originally as a gift for my 80+ year old father thinking that it would be a good way to get him Internet access. He said "what do I know about computers". I end up with the kindle and use it way more than I expected. I've read so many more books last year (a personal record of like 5). My main disappointment with the Kindle is that you need a computer to manage it. It can't be use standalone so it's not appropriate for someone that lives without computers.

This xmas (2011), I set up an iPad 2 for a 80+ year old family member. Someone reported that the iPad 2 has the same computational power as a 1985 era 8 processor Cray supercomputer with more than 1.5 GFLOPs of computing power. This is very impressive for it's small size and it's so easy to use. Now, imagine my surprise to learn that you need a iTunes account and a computer to manage it from. This is a pretty serious limitation. It gets worst, however, the browser does not support flash and Java. This means no YouTube, lectures, or TED conference videos. I could not run things like FETtoy at the nanohub.org, for example. FETtoy is an online simulator that calculates the ballistic I-V characteristics for conventional MOSFETs, Nanowire MOSFETs and Carbon NanoTube MOSFETs with a Java interface.

So, my request to mobile platform designers: treat these as primary computational devices that can stand and work on their own. Then build in the ability to work together in clusters to combine computing power.

Image Image

Animation=art & technology

morreale Saturday 03 of December, 2011
Phil McKinney from HP interviews Jeffrey Katzenberg (CEO) and Ed Leonard (CTO) of DreamWorks Animation at the Computer History Museum. Katzenberg provides some tidbits on Little Mermaid, Beauty & the Beast, How to Train your Dragon, and others. Leonard provides some insight into the technology used to make their films. It take 5 years to produce an animation and more than 60 million render hours to produce (Puss in Boots). The render hours doubles every two years. Dreamworks uses clouds now to produce their films since computer use is peaky.

1 Teraflop

morreale Thursday 17 of November, 2011
Intel has announced the Knight Corner co-processor containing more than 50 cores. It's based on a 22 nm process using the new 3D tri-gate transistor geometry. This device can operate at a sustained 1 Teraflop double floating point rate. This is truly impressive. In 1997 you would have need 9,298 Pentium II Xeon processors filling 72 cabinets to achieve this same performance. Now it requires just 1 PCI slot.

Image

Cyber security

morreale Saturday 24 of September, 2011
NIST has setup the National Initiative for Cybersecurity Education (NICE) to help people understand and protect themselves from cyber criminals. NICE held the Shaping the Future of Cybersecurity Education workshop that is now on archive. The US government has introduced the OnGuardonline.gov website to help people understand cybersecurity. The site has a lot of good information, but wish it had more advanced information for power users. Larry Clinton gave an interesting and somewhat chilling account of what a corporation could experience as a result of a cyber attack. He is part of the Internet Security Alliance which has published a The Financial Impact of Cyber Risk: 50 Questions Every CFO Should Ask.

Image