Introduction
The trusty Arduino desktop IDE has a cloud counter-part that offers similar features, but without the needed to install anything other than a small plugin and a browser. Library and board updates are done automatically. The Arduino Create Web Editor is the cloud version of the IDE, and looks and feels similar to the Arduino desktop IDE. To use the Arduino Create, a cloud compatible board is required which includes the following boards:
- MKR family boards
- Nano 33 IoT boards
- Portenta H7 boards
Arduino Create also supports Linux based devices using the Manager for Linux tool. The supported devices include the following:
- Arduino Pro Gateway
- IEI Tank AIoT Dev Kit
- Raspberry Pi
- BeagleBone
- UP Squared AI Vision Kit
- UP Squared Grove IoT Development Kit
- Arm based platforms running Debian Linux
- Intel based Platforms like the Intel NUC and the Gigabyte BRIX.
Account Setup and Things
I created my Arduino Create account, and created a new Thing called CloudSense. In the Arduino Cloud, each devices is a Thing which has a unique name and is assigned a unique ID. I installed the small plugin known as the Arduino Create Agent that allows the Arduino Create Editor to detect and communicate with the board to be programmed. I also connected my MKR WiFi 1010 to the cloud. The architecture of the Arduino Create Editor and Agent is shown below.

During the connection process, the Create Agent erupted with error messages because it could not identify the MKR WiFi 1010 board. It turns out that I also had a Microchip SAM E70 Xplained board, a MPLAPX PICkit 4 debugger, a SAM D20 Xplained board, a Arduino Uno, and a Microchip Curiosity board plugged into the computer via a USB hub as well. The Create Agent does did not seem to be able to determine which board to select. I disconnected all but the MKR WiFi 1010 and the Arduino Agent was able to connect the board to my CloudSense Thing.
Once the device is connected to the Arduino IoT Cloud, the device wireless network connection must be configured. I added my wireless router SSID and password used on a guest network on my wireless router for small devices to keep them isolated my main network until I better understand the security implications of connecting these cloud connected devices to my LAN.
Uploading a Sketch
I uploaded my first sketch from the Create Editor to the board. The sketch is a modified version of the sketch from the prior blog Arduino WiFi 1010 with carrier board and Sensor Demo that was derived from the WiFi RTC tutorial. It was modified to run on the cloud and to use IoT dashboard features. Only the variables defined in the CloudSenes Setup tab can be displayed on the IoT Dashboard, and these variables are automatically defined in thingProperties.h instead of in the main sketch. WiFi network configuration information is stored in the Secret tab. This allows you to share your sketch without divulging your wireless LAN SSID and password.
This examples illustrates how an instrument built with an Arduino can be connected to the cloud to share the measurement status with a large group of interested collaborators. The goal is to share and analyze data from multiple instruments located anywhere in the world. This effort is intended to demonstrate an automated means of controlling, monitoring, and sharing test data for the Direct Air Carbon Capture (DACC) test unit known as Violet being developed by the OpenAir Collective. Data sharing and analysis will be explored in future blogs.
Sensor Connections
The Arduino WiFi 1010 is connected to four sensors and an LED Socket kit for the CloudSense sketch. I used sensor from the Grove starter kit and sensors I purchased for another project to see how the Arduino Cloud Create works. The sensors and associated variables are as follows.

An LED Socket kit is connected to port D2 and is turned on when the sound level is greater than a threshold value. The block diagram of the connections to the Arduino WiFi 1010 is shown below.
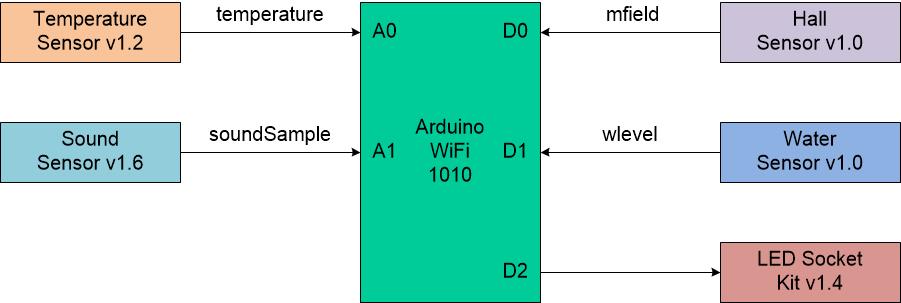
I expect to upgrade the configuration with sensor that are more appropriate for the application once they have been determined.
Arduino Create
I used Arduino Create to make a new sketch and pasted the Arduino WiFi 1010 with carrier board and Sensor Demo sketch into it. It turns out that it might have been easier to use the import function instead. Arduino Create augmented the CloudSense Sketch name to CloudSense_jan19a. The _jan19a part of the name does not appear in the Arduino IoT Cloud setup.

Connecting Things to the Cloud
I used the GO TO IOT CLOUD button to setup variables to display on the Dashboard tab.
Setup
The following four variables were defined so they could be displaced on the Dashboard. These include the following variables:
- mfield: An int variable for state of the magnetic Hall sensor
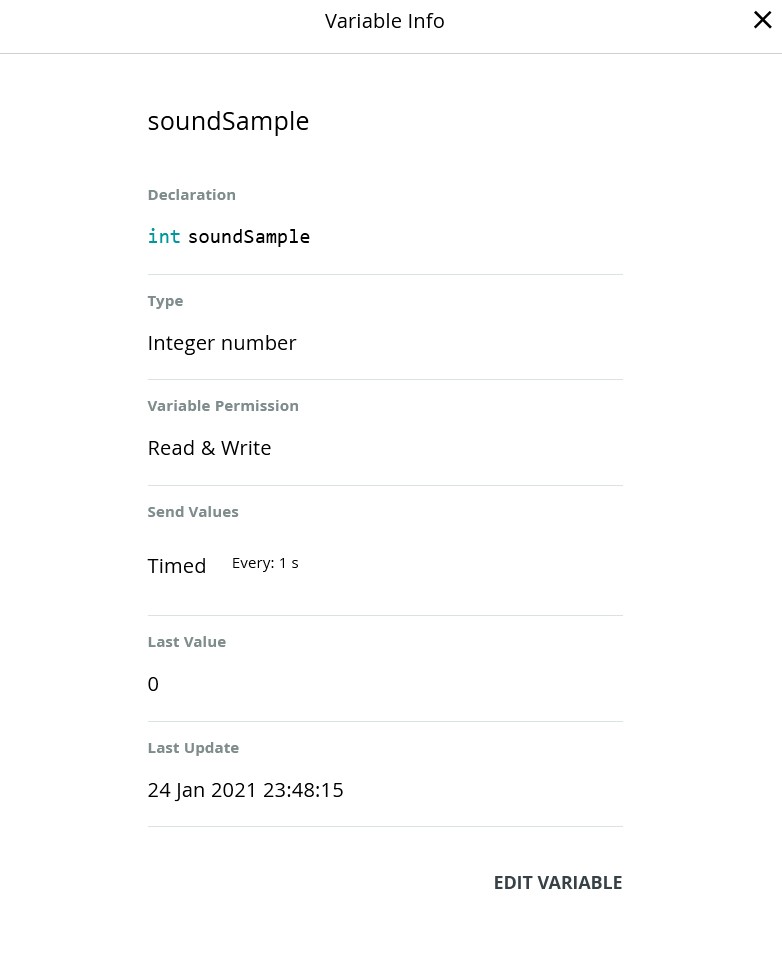
- soundSample: An int variable for the sound sample level
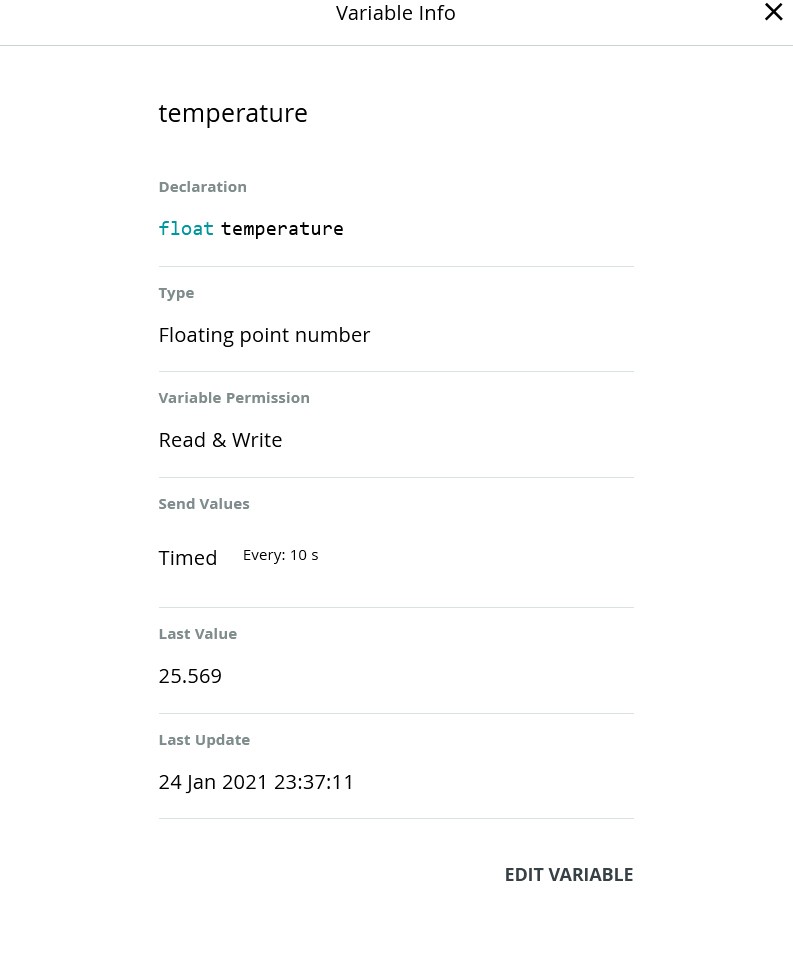
- temperature: A float variable with the calculated value of the temperature
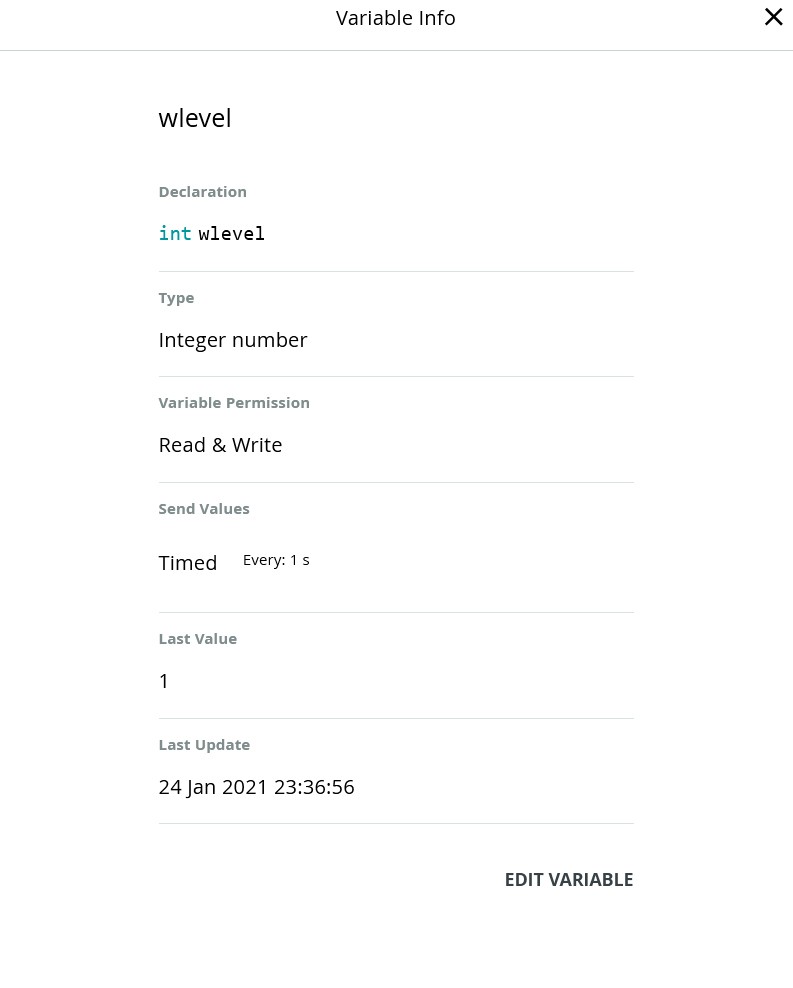
- wlevel: An int variable with the state of the water sensor
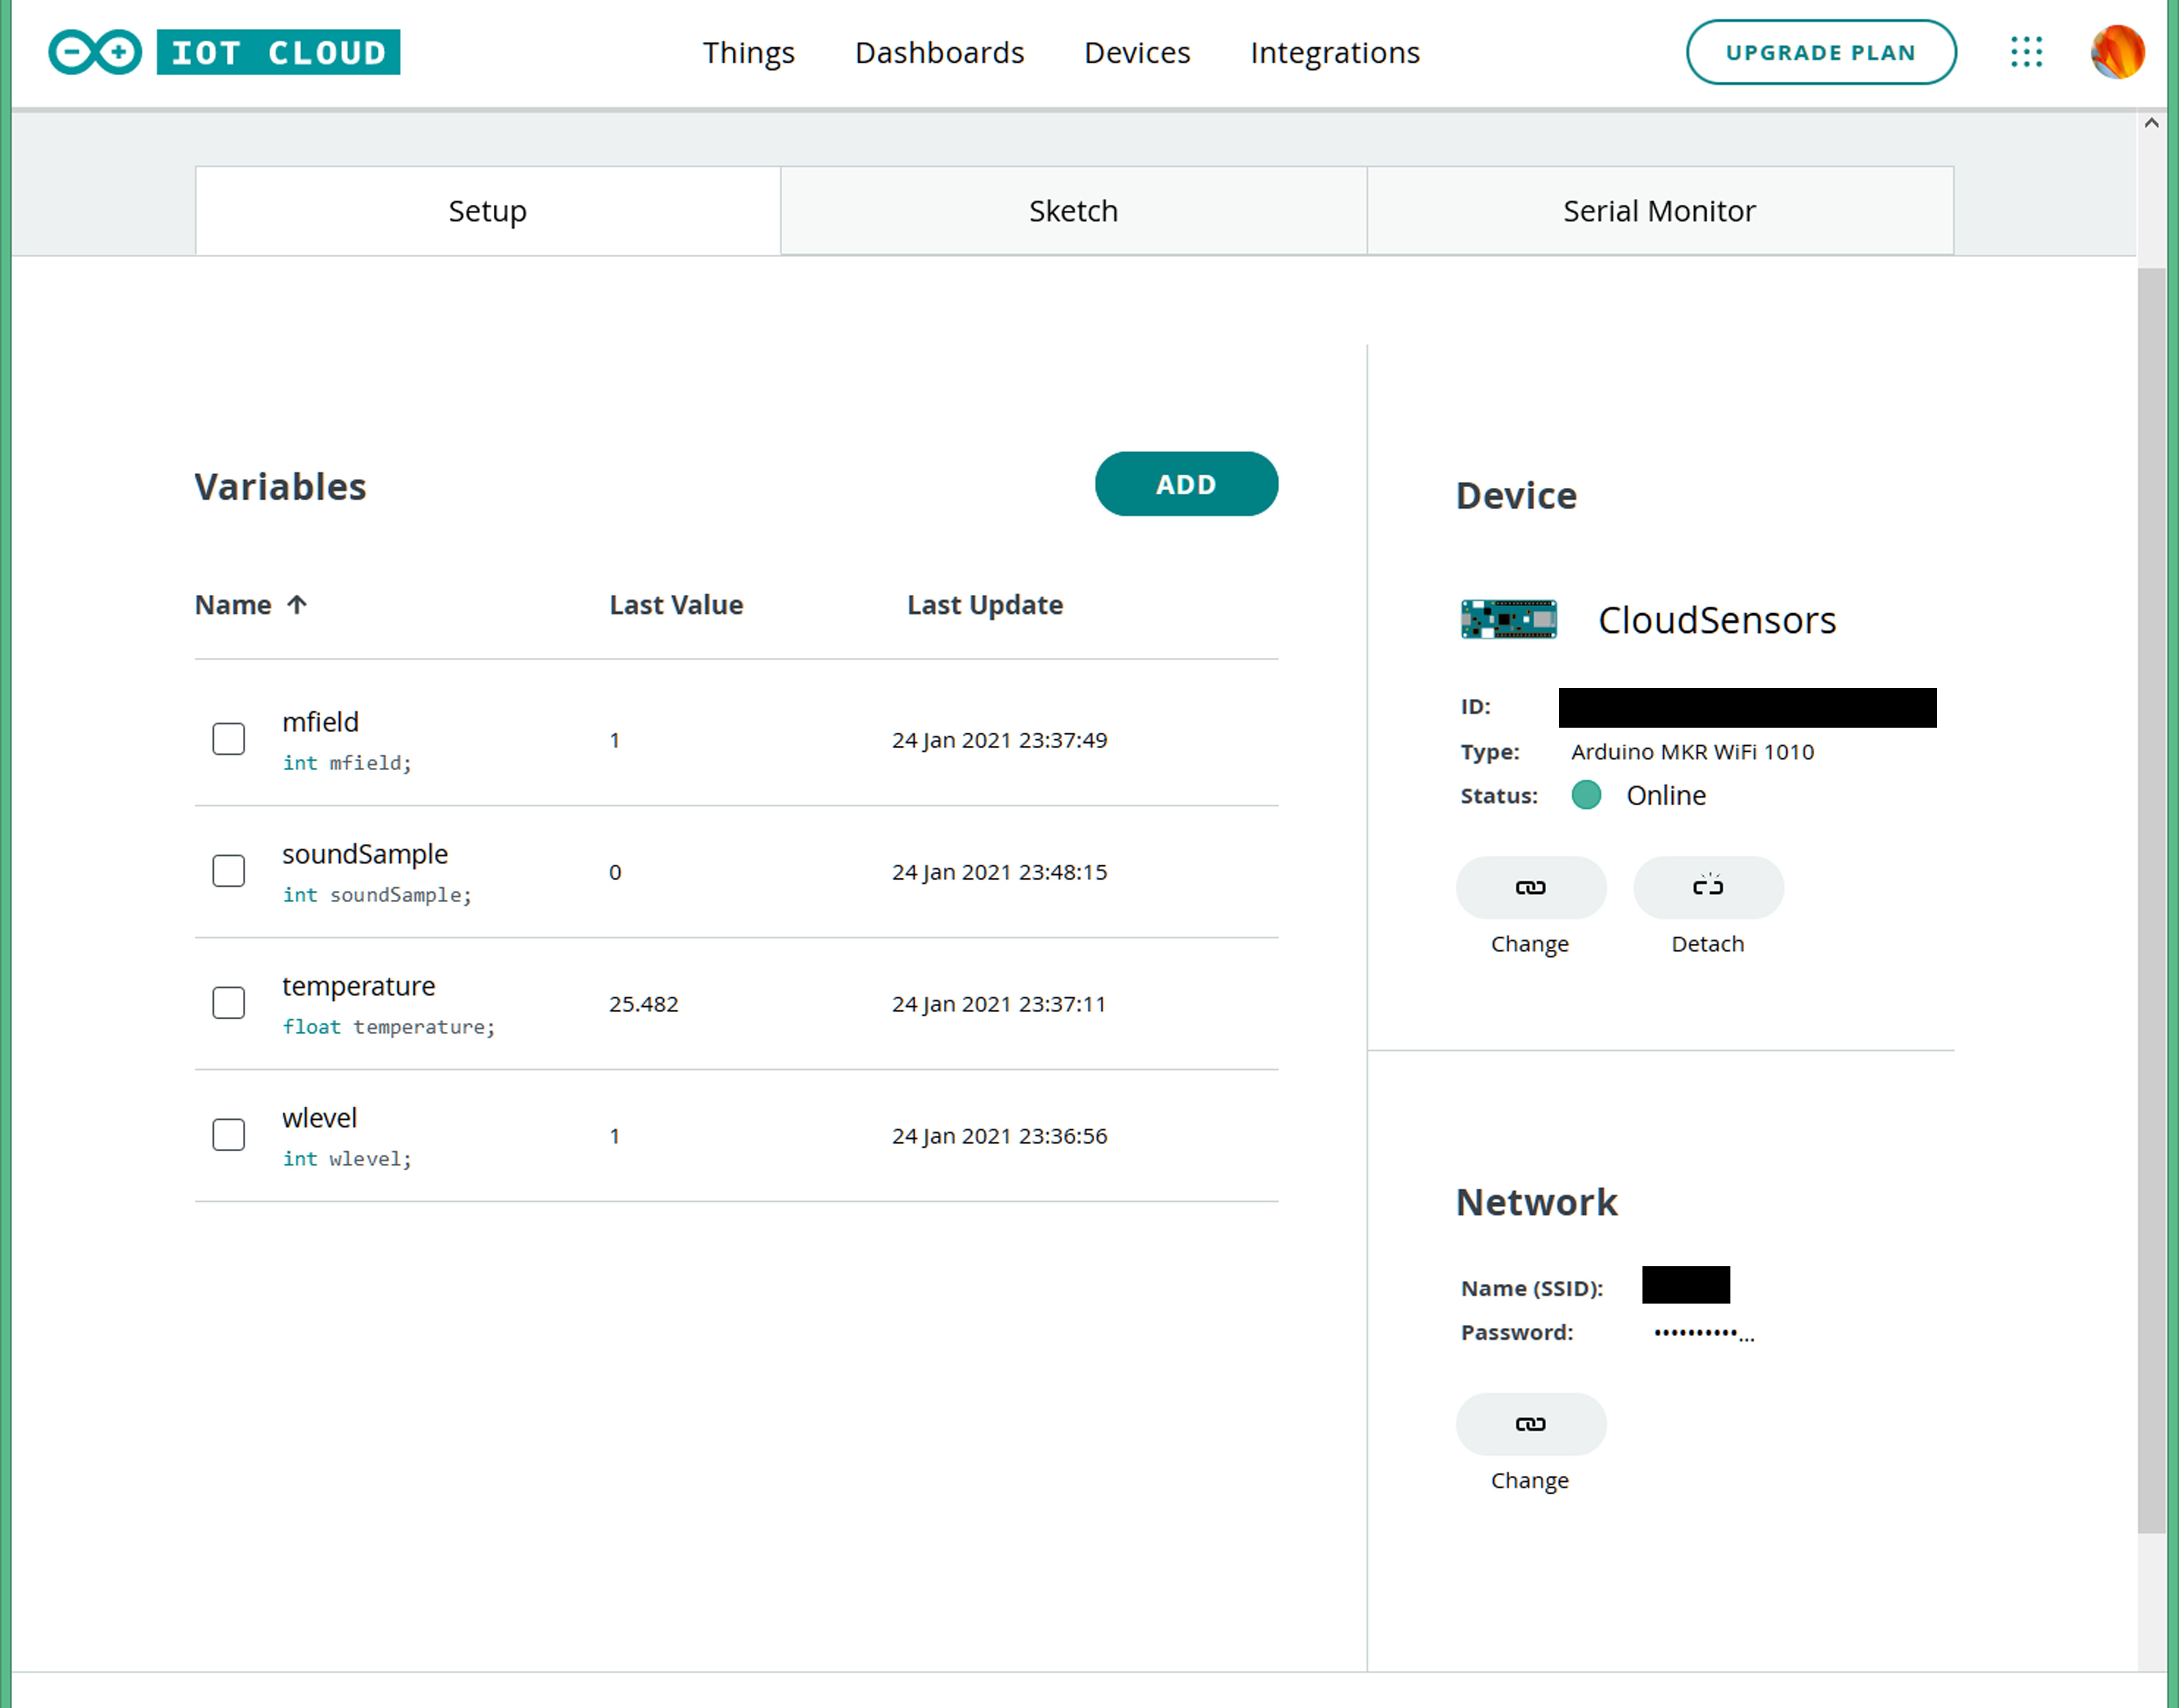
The figure below shows the four variable definitions, the Device connectivity, and the Network connection configuration. These variable definitions are automatically defined in the thingProperties.h file. I had to remove my definitions from the main sketch (CloudSense_jan19a) to avoid conflicts with the same variable definitions in thngProperties.h when uploading the sketch to the board.
Variables
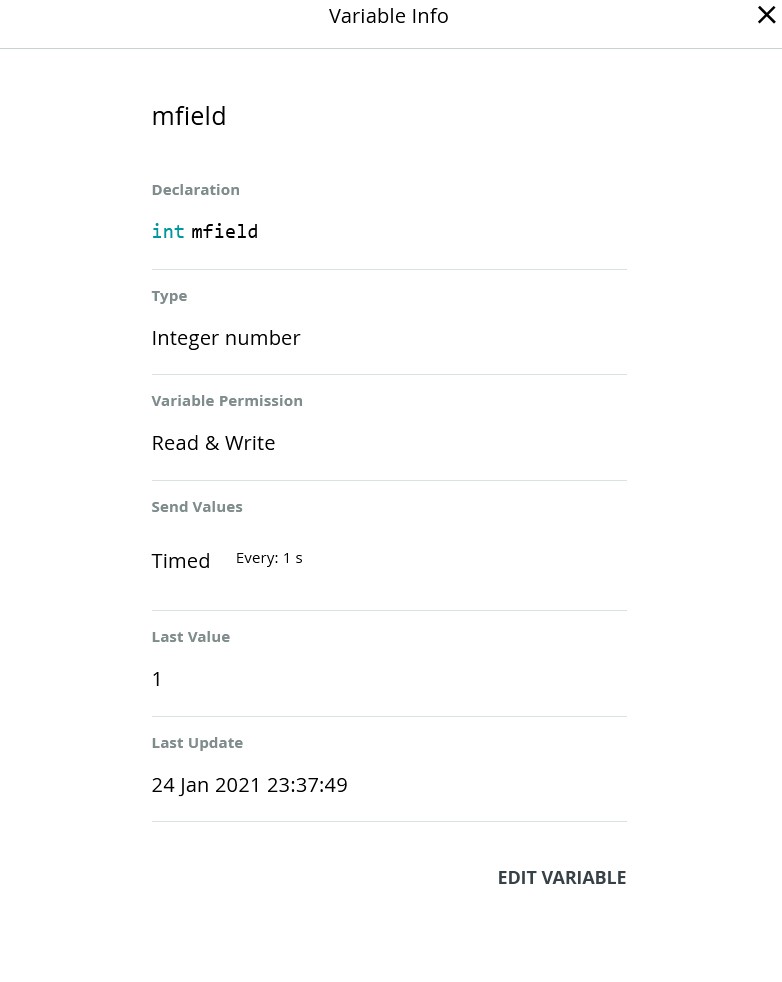
A detailed view of the variables setup follows. In addition to the C programming language variable type, the Arduino Create Variable definition provides variable permissions and a variable update policy.
Variable permissions are Read & Write, or Read Only. Read Only variables are output from the board. Read & Write variables can be modified by the board and in the cloud (i.e. used as an output from the board and input from the cloud).
The variable update policy is either On Change or Periodically. For the On Change option, a threshold is set to trigger when the variable changes. A function is added to the main sketch so that code can be executed when this change occurs. Example code for the On Event for the temperature variable is shown below.
void onTemperatureChange() {
  // Do something
}
For the Periodically option, a value for the time the event updates is set in seconds. Note that the event updates for these variables were set to 1 second, but the sketch uses a real time clock to sample the sensors at the start of every minute.
Magnetic Field Variable Configuration
The mfield variable is used to sample measurements of the magnetic field from the Grove Hall Sensor v1.0 that is connected to Digital Port 0 (D0). This sensor board contains a Hall effect device that switches on (logic low) when a south polarized magnetic field is perpendicular to the device and has field strength greater than a threshold value (BOP).
I purchased this sensor thinking that it could detect the magnetic field present in a AC power cable when current was flowing through the cable. It turns out that the magnetic threshold is too high to be useful for this application.
I would also investigate changing the sketch in the future to make mfield a Boolean variable type since the sensor only outputs on or off instead of a digital value. I would also change the variable permission to Read permission instead of Read & Write permission as the cloud would not change this variable with a UI switch or other cloud based user input.
Sound Sample Variable Configuration
The soundSample variable is used to sample measurements from the Grove Sound Sensor V1.6 that is connected to Analog Input 1 (A1). The board contains an electret microphone and an LM358 op-amp amplifier that produces an analog output proportional to the sound level. An AnalogRead() on the MKR WiFi 1010 produces a reading with 12 bits of resolution. The variable permission could also be changed to a Read permission instead of Read & Write.
Temperature variable Configuration
The temperature variable is used to sample measurements from the Grove Temperature Sensor V1.2 that is connected to Analog Input 0 (A0). The board contains an Negative Temperature Coefficient (NTC) thermistor and an LM 358 op-amp to produce an analog voltage proportional to the temperature.
Water Level Variable Configuration
The wlavel variable is used to sample readings from the Grove Water Sensor v1.0 that is connected to Digital Input 1 (D1). The water sensor can indicate if it is dry or wet using a DigitaRead(). It has interdigitated traces providing a measure of conductivity. The conductivity structure is pulled up with a 1Meg ohm resistor. When the traces are dry, a DigitalRead() will be logic high. When the traces are wet, the water shorts traces to ground and a DigitalRead will be a logic low (0). This sketch here uses DigitalRead() to determine when the sensor is wet.
The Water Sensor could be moved to an Analog port and could be sampled with an AnalogRead(0) to get a range of wetness levels.
Sketch
The sketch integrates all the sample code for each sensor with the code from the WiFi RTC tutorial, and samples each sensor sequentially every minute based on the real time clock. The sketch prints the time and value for sensor along with some text labels at the top of each minute to the serial monitor.
Serial Monitor
The figure below shows the output of the serial monitor when the program is running on the Cloud. To get a temperature change, I place my finger on the thermistor on the temperature sensor. I add a bit of water to the water sensor, and put a magnet near the Magnetic field sensor to get them to change values, but these changes were not captured in this figure.

Dashboard
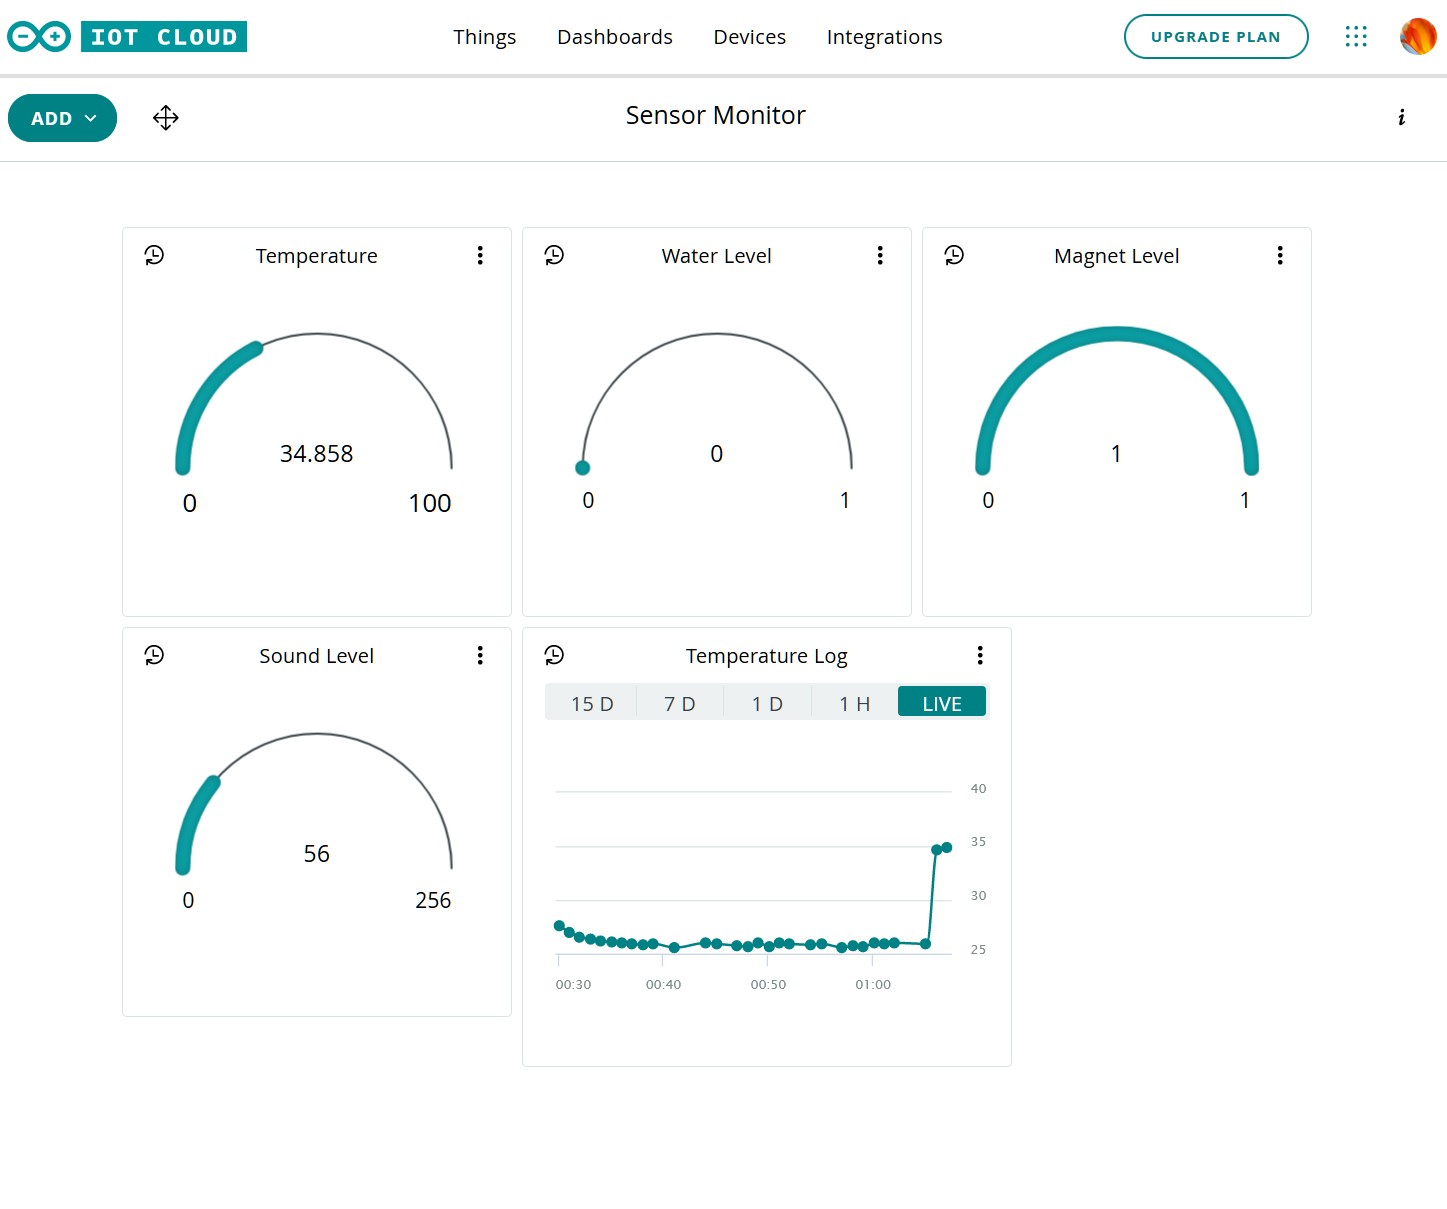
The dashboard was created by adding gauges to display the values of the temperature, wlevel, mfield, and soundSample variables. I also added a chart for the temperature variable to see the change over time.
The figure below shows the state of the sensors a short time after the sketch was started. A magnet was placed near the Hall sensor so it shows low, and the a drop of water was placed on the water sensor so it registers low. The Sound Sensor did not register a sound levels when this image was captured.
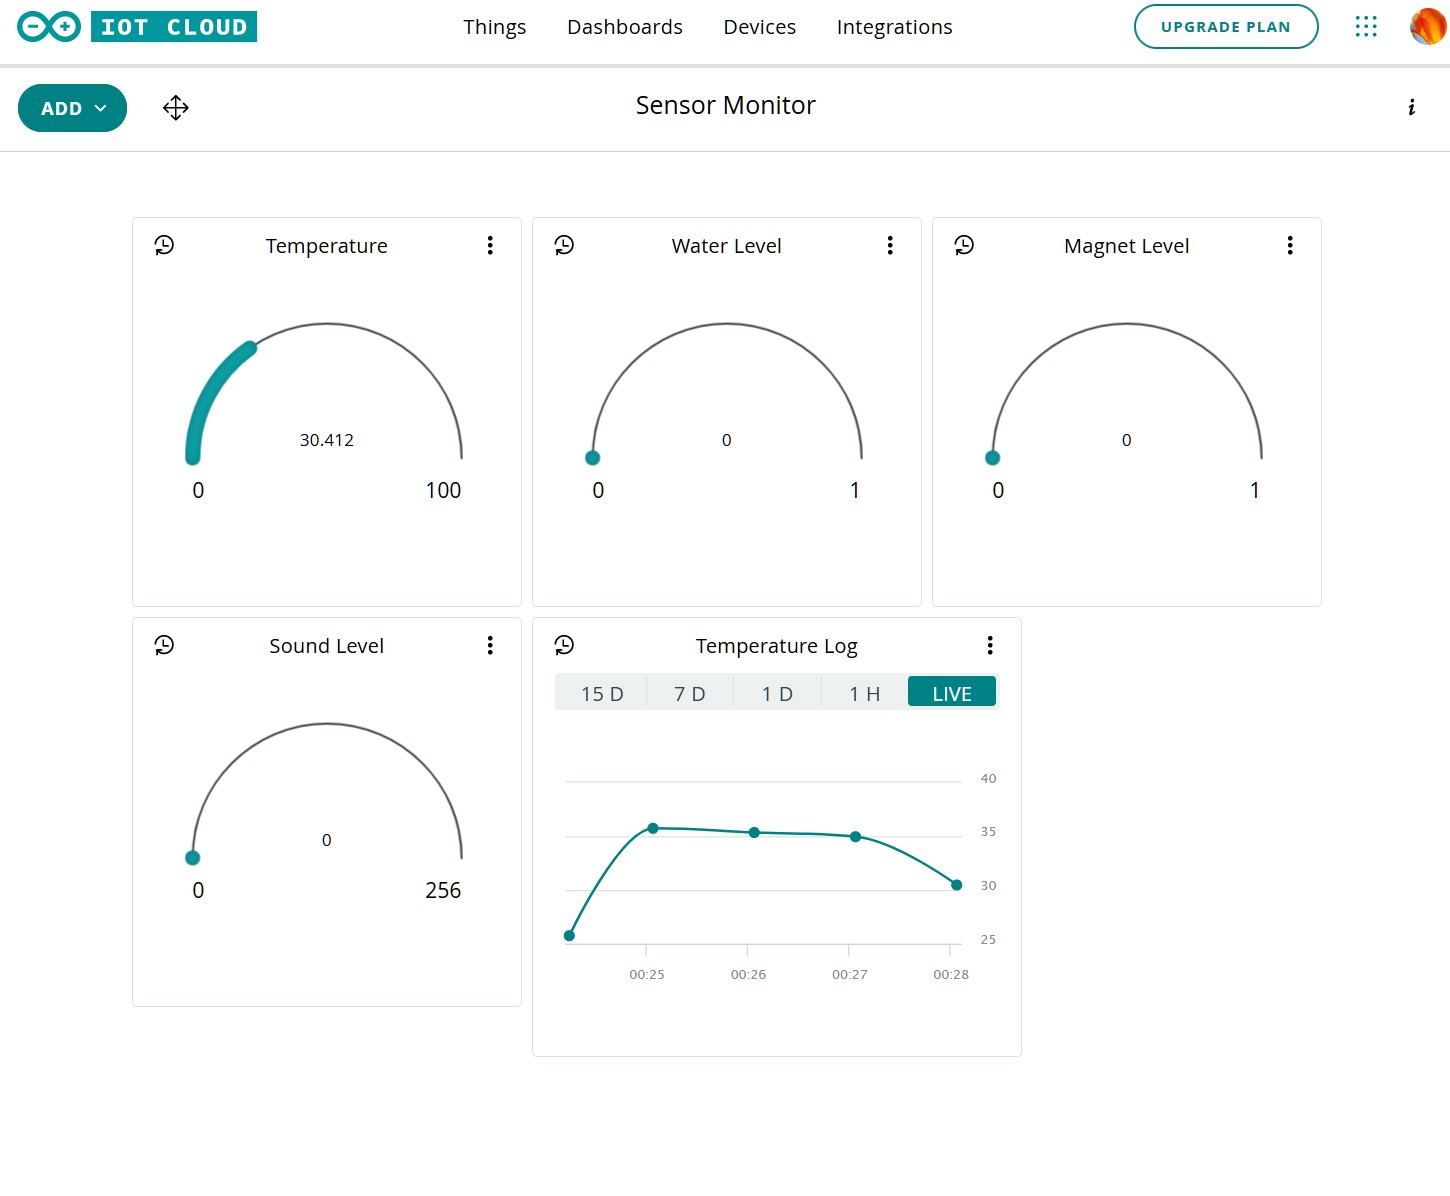
The figure below shows the status of the sensor after some time elapsed. A drop of water was placed on the water sensor so it registers a logic low. The magnet was too far away from the Hall sensor so it registers a logic high (no magnetic field above BOP), and the sound sensor picked up a sound level when this image was captured. The temperature log shows about 30 minutes of temperature samples. The log can be saved to a csv file.
CloudSense
CloudSense is the main sketch (C program).
/*
  Sketch generated by the Arduino IoT Cloud Thing "CloudSense"
  https://create.arduino.cc/cloud/things/<key-removed-for-security>

  Arduino IoT Cloud Variables description

  The following variables are automatically generated and updated when changes are made to the Thing

  float temperature;
  int wlevel;
  int mfield;
  int soundSample;

  Variables which are marked as READ/WRITE in the Cloud Thing will also have functions
  which are called when their values are changed from the Dashboard.
  These functions are generated with the Thing and added at the end of this sketch.
*/


#include "thingProperties.h"
#include <SPI.h>
#include <WiFiNINA.h>
#include <WiFiUdp.h>
#include <RTCZero.h>

/*
 *  Digital sensor pin definitions
 */
#define HALL_SENSOR 0
#define WATER_SENSOR 1
#define LED_01 2

/*
 * Analog sensor pin definitions
 */
#define pinTemp A0            // Define the pin to which the temperature sensor is connected.
#define pinSound A1           // Define the pins to which the sound sensor and LED are connected.

int keyIndex = 0;             // your network key Index number (needed only for WEP)
int status = WL_IDLE_STATUS;  // define a variable for the wifi status

WiFiSSLClient client;         // initialize the WiFi client library

/*
 * Define varialbles for calculationg local time for a given timezone.
 */
const int GMT = -5;           // change this to adapt it to your timezone
int diff = 0;                 // difference between gmt hours and GMT
int tz = 0;                   // hours correct for GMT time zone when GMT < 0
int tzhours = 0;              // used to hold the rtc.getHours value


/*
 * The following vairables are defined in thingProperties.h and
 * are generated automatically when you define a variable in
 * the setup. Defining them in the sketch will result in a
 * conflict.
 *
 * int mfield = 0;               // magnetic field read value
 * int wlevel = 0;               // water level read value
 * float temperature = 0;        // thermister temperature
 * int soundSample = 0;          // variable to hold the sound sample
 */

/*
 * Define variables for for the sensors
 */
const int B = 3975;           // thermister coefficient b-value
int tempVal = 0;              // thermister read value
float resistance = 0;         // thermister resistance
int soundVal = 0;             // sound lever read value
int soundThreshold = 4;       // sound level threahold value


/*
 * Define variables for the server
 */
char server[] = "www.arduino.cc";
bool sendRequest = true;      // used to understand if the http request must be sent

RTCZero rtcx;                  // create an RTC object


void setup() {
  // Initialize serial and wait for port to open:
  Serial.begin(9600);
  // This delay gives the chance to wait for a Serial Monitor without blocking if none is found
  delay(1500);

  // Defined in thingProperties.h
  initProperties();

  // Connect to Arduino IoT Cloud
  ArduinoCloud.begin(ArduinoIoTPreferredConnection);

  /*
     The following function allows you to obtain more information
     related to the state of network and IoT Cloud connection and errors
     the higher number the more granular information you’ll get.
     The default is 0 (only errors).
     Maximum is 4
 */
  setDebugMessageLevel(2);
  ArduinoCloud.printDebugInfo();

  pinMode(HALL_SENSOR, INPUT);
  pinMode(WATER_SENSOR, INPUT);
  pinMode(pinTemp, INPUT);
  pinMode(pinSound, INPUT);
  pinMode(LED_01,OUTPUT);

  checkWiFi();               // test to see that the WiFi module is working
  connectWiFi();             // connect to the wifi network and wait until it connects

  printWiFiStatus();        // print the status of the wifi network connection

/*
 * rtc was changed to rtcx so that it did on conflict with the ArduinoCloud setup
 */
  rtcx.begin();              // start the real time clock (RTC)

  getNTPtime();             // setup the RTC by getting the epoch from the NTP server
  enableRTCAlarm();         // stup the alarm to enable every minute
}


void loop() {
  ArduinoCloud.update();
  // Your code here
  //tempValx = temperature;
  if (sendRequest) {
    sendRequest = false;
    printDate();              // print the date as month, day, year
    printTime();              // print the time in hours, minutes, seconds for the timezone
    printTempSense();         // print the temperature
    printWaterSense();        // print the water sensor output 0=wet
    printMfieldSense();       // print the magnetic field sensor output 0=magnetic field
    printSoundSense();        // print the output of the sound sensor
    Serial.println();
    // httpRequest();
    // listenToClient();
  }
}

/*
 * Test the WiFi module works. Run once in setup()
 */
void checkWiFi() {

  if (WiFi.status() == WL_NO_SHIELD) {
    Serial.println("WiFi shield not present");

    // don't continue:

    while (true);
  }
}


/*
 *  Setup the wifi module by attempting to connect to WiFi network. Run once in setup()
 */
void connectWiFi() {

  while ( status != WL_CONNECTED) {

    Serial.print("Attempting to connect to SSID: ");
    Serial.println(SSID);

    // Connect to WPA/WPA2 network. Change this line if using open or WEP network:

    status = WiFi.begin(SSID, PASS);

    // wait 10 seconds for connection:

    delay(10000);
  }
}


/*
 * Setup the RTC by getting the time form the NTP. Run once in setup()
 */
void getNTPtime() {

  unsigned long epoch;
  int numberOfTries = 0, maxTries = 6;

  do {
    epoch = WiFi.getTime();
    numberOfTries++;
  }

  while ((epoch == 0) && (numberOfTries < maxTries));

  if (numberOfTries == maxTries) {
    Serial.print("NTP unreachable!!");
    while (1);
  } else {
    Serial.print("Epoch received: ");
    Serial.println(epoch);
    rtcx.setEpoch(epoch);
    Serial.println();
  }
}


 /*
  * Print the time
  */
void printTime() {

  tzhours = gmtHour(rtcx.getHours(), GMT);
  print2digits(tzhours);
  Serial.print(":");

  print2digits(rtcx.getMinutes());
  Serial.print(":");

  print2digits(rtcx.getSeconds());
}


/*
 * The original code to compute the time corrected for the users
 * timezone does not work for negatve GMT values. gmtHour() calculates
 * the correct hour assuming a 24 hour clock.
 */
int gmtHour(int hr, int gmt) {

  diff = (hr + gmt);
  if(diff < 0 ) {
    tz = (24 + diff);
  } else {
    tz = diff;
  }
  return tz;
}


/*
 * Print the date in month, day, year (mm/dd/yy) format
 */
void printDate() {

  Serial.print(rtcx.getMonth());
  Serial.print("/");

  Serial.print(rtcx.getDay());
  Serial.print("/");

  Serial.print(rtcx.getYear());
  Serial.print(" ");
}


/*
 * Print the WiFi status
 */
void printWiFiStatus() {

  // print the SSID of the network you're attached to:

  Serial.print("SSID: ");
  Serial.println(WiFi.SSID());

  // print your WiFi shield's IP address:

  IPAddress ip = WiFi.localIP();
  Serial.print("IP Address: ");
  Serial.println(ip);

  // print the received signal strength:

  long rssi = WiFi.RSSI();

  Serial.print("signal strength (RSSI):");
  Serial.print(rssi);
  Serial.println(" dBm");
}


/*
 * Print a number with two digits
 */
void print2digits(int number) {

  if (number < 10) {
    Serial.print("0");
  }

  Serial.print(number);
}

/*
 * Print the temperature
 */
void printTempSense() {
  // Print the temperature to the serial console.
  Serial.print(", Temperature: ");
  Serial.print(sampleTemp());
  Serial.print(" C, ");
 }

 /*
  * Print the water sensor state
  */
void printWaterSense() {
  Serial.print("Water level: ");
  Serial.print(sampleWlevel());
  }

  /*
   * Print the magnetic field sensor output 0=magnetic field present
   */
void printMfieldSense() {
  Serial.print(", mfield: ");
  Serial.print(sampleMfield());
}

/*
 * Print the sound level
 */
void printSoundSense() {
  Serial.print(", Sound Level: ");
  Serial.print(soundSample = sampleSound());
  setLED(soundSample, soundThreshold);
}

/*
 * Sample the temperature
 */
float sampleTemp() {
  // Read the temperature value
  tempVal = analogRead(pinTemp);

  // Determine the current resistance of the thermistor based on the sensor value.
  resistance = (float)(1023-tempVal)*10000/tempVal;

  // Calculate the temperature based on the resistance value in degrees Celsius.
  temperature = 1/(log(resistance/10000)/B+1/298.15)-273.15;
  return temperature;
}


/*
 * Sample the sound level
 */
int sampleSound() {
  //
  soundVal = analogRead(pinSound);
  return soundVal;
}


/*
 * Sample the magnetic field
 */
int sampleMfield() {
  // read magnetic field sensor
  mfield = digitalRead(HALL_SENSOR);
  return mfield;
}

/*
 * Sample the water sensor
 */
int sampleWlevel() {
  // read the water sensors
  wlevel = digitalRead(WATER_SENSOR);
  return wlevel;
}


/*
 * Turn the LED on if s > th
 */
void setLED(int s, int th) {
  if(s > th) {
    digitalWrite(LED_01, HIGH);
  } else {
    digitalWrite(LED_01,LOW);
  }
}


/*/
 * Set the alarm to enable every minute
 */
void  enableRTCAlarm() {
  rtcx.setAlarmTime(0, 0, 0);    //in this way the request is sent every minute at 0 seconds
  rtcx.enableAlarm(rtcx.MATCH_SS);
  rtcx.attachInterrupt(alarmMatch);
 }

/*
 * Enable the alarm
 */
 void alarmMatch() {
  sendRequest = true;
}

/*
 * this method makes a HTTP connection to the server:
 */
void httpRequest() {
  sendRequest = false;

  Serial.println();
  Serial.print("Request made @ ");
  printTime();
  int clientStatus = client.connect(server, 443);
  Serial.print(" status: ");
  Serial.print(clientStatus);
  Serial.println();

  if (client.connect(server, 443)) {

    // Make a HTTP request:

    //client.println("GET /asciilogo.txt HTTP/1.1");
    client.println("GET /search?q=arduino HTTP/1.1");
    client.println("Host: www.arduino.cc");
    client.println("Connection: close");
    client.println();
  } else {
    Serial.println("connection failed");
  }
}

void listenToClient(){
  unsigned long startTime = millis();
  bool received = false;
  while ((millis() - startTime < 5000) && !received) { //try to listen for 5 seconds
    while (client.available()) {
      received = true;
      char c = client.read();
      Serial.write(c);
    }
  }
  client.stop();
  Serial.println();
}

/*
 * The following functions were automatically defined by the variables
 * defined in the setup
 */

void onWlevelChange() {
  // Do something
}


void onTemperatureChange() {
  // Do something
}


void onMfieldChange() {
  // Do something
}


void onSoundSampleChange() {
  // Do something
}
thingProperties.h
thingProperties.h is automatically generated by the Arduino IoT Cloud, and contains the Variables defined in the Cloud Setup tab.
// Code generated by Arduino IoT Cloud, DO NOT EDIT.

#include <ArduinoIoTCloud.h>
#include <Arduino_ConnectionHandler.h>


const char THING_ID[] = "<key-removed-for-security";

const char SSID[]     = SECRET_SSID;    // Network SSID (name)
const char PASS[]     = SECRET_PASS;    // Network password (use for WPA, or use as key for WEP)

void onTemperatureChange();
void onWlevelChange();
void onMfieldChange();
void onSoundSampleChange();

float temperature;
int wlevel;
int mfield;
int soundSample;

void initProperties(){

  ArduinoCloud.setThingId(THING_ID);
  ArduinoCloud.addProperty(temperature, READWRITE, 10 * SECONDS, onTemperatureChange);
  ArduinoCloud.addProperty(wlevel, READWRITE, 1 * SECONDS, onWlevelChange);
  ArduinoCloud.addProperty(mfield, READWRITE, 1 * SECONDS, onMfieldChange);
  ArduinoCloud.addProperty(soundSample, READWRITE, 1 * SECONDS, onSoundSampleChange);

}

WiFiConnectionHandler ArduinoIoTPreferredConnection(SSID, PASS);
Secret
The Secret file contains the WiFi SSID and Password used by the sketch. This information does not get shared when you share your sketch with others.
SECRET_SSID <SSID-goes-here>
SECRET_PASS <PASS-goes-here>
References

